For new RVers, the dump station can seem like a daunting and, let’s be honest, slightly gross rite of passage. Visions of spills and messes might cross your mind, but with the right knowledge and a little practice, it’s a simple, clean, and essential part of the RV lifestyle. Properly dumping your RV’s holding tanks—the black tank for human waste and the grey tank for sink and shower water—is crucial for hygiene and preventing clogs.
This comprehensive, step-by-step guide will walk you through the entire process, from setting up to cleanup, ensuring you can tackle this task with confidence.
Understanding Your RV’s Tank System
Before you get started, it’s helpful to understand the basic components you’ll be working with:
- Black Tank: This is the tank that holds all the waste from your RV toilet. It is the most important tank to manage properly.
- Grey Tank: This tank collects all the “dirty” water from your sinks and shower. It’s not as hazardous as the black tank, but it can still contain soap, food particles, and hair.
- Sewer Hose: This is the flexible hose that connects your RV’s waste outlet to the dump station or full hookup site.
- Gate Valves: These are the handles (usually one for the black tank and one for the grey tank) that you pull to open and close the flow from each tank.
- Waste Outlet: The main port on the side of your RV where the sewer hose attaches.
Step-by-Step Guide to Dumping Your RV Tanks
Follow these steps in the correct order to ensure a clean and efficient process.
Step 1: Park and Prepare
First, park your RV as close to the dump station as you can while still leaving enough room to work comfortably. The waste outlet on your RV should be in a direct line with the dump station inlet.
Next, gather your tools. You’ll need:
- A sturdy sewer hose kit with connectors
- Disposable gloves (non-negotiable!)
- A clear elbow connector (highly recommended to see when the flow is clear)
- A garden hose (often called a “black tank flush” hose, separate from your drinking water hose)
- RV-specific toilet chemicals or a tank treatment product
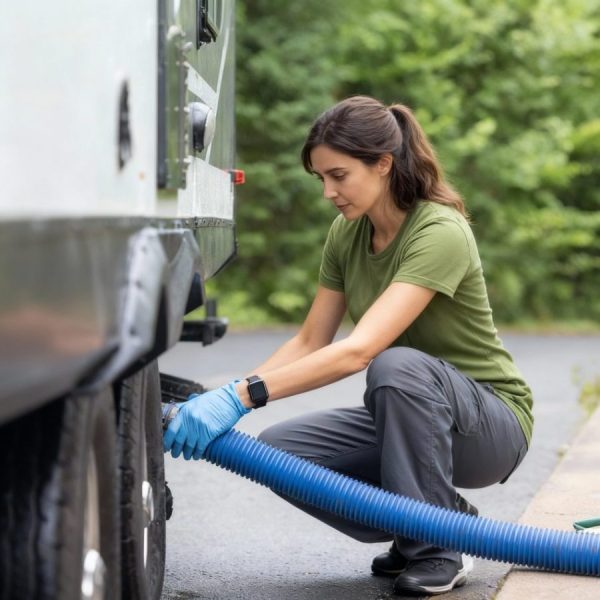
Put on your gloves before you touch anything.
Step 2: Connect the Sewer Hose
Carefully remove the cap from your RV’s waste outlet. The cap might have some residual drips, so be prepared. Attach one end of your sewer hose to the outlet by twisting it into place.
Walk the other end of the hose to the dump station inlet and securely place it inside. If your hose doesn’t stay in place, use a weight or a sewer hose support to keep it from popping out. Ensure the hose is on a slight downward slope so gravity can do its job.
Step 3: Open the Black Tank Valve (The Important Part!)
This is the most critical step. Always dump the black tank first. Pull the gate valve for your black tank all the way open. You’ll hear and see the contents begin to flow through the hose. If you have a clear elbow, you can visually confirm that the waste is flowing and see when it slows down.
Wait until the flow completely stops. This can take several minutes.
Step 4: Rinse the Black Tank (Optional, but Highly Recommended)
Once the black tank is empty, it’s time to rinse it out. This step is crucial for preventing clogs, controlling odors, and ensuring your tank sensors work correctly.
If your RV has a built-in black tank flush system, connect your non-potable garden hose to the designated inlet on your RV. Turn on the water and let it run for a few minutes while the black tank valve is still open. The water jets inside the tank will help break up and flush out any remaining solids. You’ll see the water in your clear elbow go from dark to a lighter, clearer color.
If you don’t have a flush system, you can use a separate wand that goes down the toilet, or simply fill the toilet with a few gallons of water and flush it through.
Step 5: Close the Black Tank Valve
Once you’ve finished flushing the black tank and the flow is clear, push the black tank gate valve back in to close it.
Step 6: Open the Grey Tank Valve
Now it’s time to dump the grey tank. Pull the grey tank gate valve all the way open. The grey water will flow out, and since it’s much cleaner than the black water, it will help rinse the sewer hose of any remaining black tank residue. This is why you always dump the grey tank last.
Wait until the grey water flow stops completely.
Step 7: Close the Grey Tank Valve and Disconnect
Push the grey tank gate valve back in to close it. Now, you can carefully disconnect the hose from the dump station inlet. Be prepared for a small amount of residual water to drain.
Then, disconnect the hose from your RV’s waste outlet and replace the cap.
Step 8: Cleanup and Storage
This is where you prevent messes and keep your gear in good condition.
- Hold the hose up and let it drain completely.
- Rinse the outside of your hose and the dump station area with a separate hose (if one is available at the station).
- Use a separate hose to rinse the dump station itself, leaving it clean for the next RVer.
- Neatly coil or fold your sewer hose and store it in a designated, airtight storage area. Never store your sewer hose in the same compartment as your fresh water hose or other clean supplies.
- Remove your gloves and dispose of them properly.
- Wash your hands thoroughly with soap and water or use a hand sanitizer.
Highlights to Check Out:
- The Right Order is Everything: Black tank first, then grey tank. This simple rule prevents a huge mess and helps clean your hose.
- Gloves are Your Best Friend: Don’t skip them, even for a quick disconnect.
- Get a Clear Elbow: It’s a game-changer. Seeing the flow allows you to know when the tank is truly empty and when the flush water is running clear.
- Invest in a Good Hose: A quality, durable sewer hose will prevent punctures and leaks, saving you from a major headache.
- Treat Your Tanks: Using a good quality tank treatment or chemical will help break down waste, control odors, and keep your sensors working properly. Add a dose to the black tank after dumping.
Conclusion
Dumping your RV’s tanks is a fundamental skill for any RVer, and it doesn’t have to be a dreaded chore. By following this step-by-step guide, you’ll be able to confidently handle the process from start to finish. Remember the key takeaways: always dump the black tank first, wear gloves, and use the grey tank to give your hose a final rinse. With these tips, you’ll ensure your RV’s sanitation system remains healthy, your travel remains clean, and you can get back to enjoying the open road.